React Testing Library
Guide
React Testing Library 在DOM Testing Library的基础上添加一些API,主要用于测试React组件。如果是其它的技术栈,可以选择对应的Testing Library 库。该库在使用过程并不关注组件的内部实现,而是更关注测试。该库基于react-dom和react-dom/test-utils,是以上两者的轻量实现。
Vs Jest
RTL并不是Jest的替代选择,两者不是二选一的关系,Jest是Javascript最流行的测试框架,Jest就是一个test runner,可以命令行式的跑所有的测试用例,并且 提供测试suites、cases、断言的函数,还有spies, mocks, stubs等。而RTL,只是testing library中为React定制的一个分支,其他的还有Vue、Angular等,测试库其他比如还有Enzyme 等。
安装
同Jest一样,如果create-react-app创建的,RTL已内置好,但比如专门用于测试hooks的@testing-library/react-hooks 还是要自己添加安装。
pnpm i @testing-library/react @testing-library/user-event @testing-library/jest-dom -D
# 基于eslint和testing library的最佳实践去提示,避免一些常见的错误
pnpm i eslint-plugin-testing-library -D@testing-library/dom: 一个轻量级的(DOM 查询、交互)测试解决方案,它使用了一种与 ”用户的在页面中查找元素" 类似的DOM查询方式,以保证准确性;@testing-library/react: 在@testing-library/dom基础上,将React组件渲染为DOM便于后边测试;@testing-library/user-event: 提供了更加高级的浏览器交互模拟 – 即事件;@testing-library/jest-dom:追加一系列辅助测试 DOM 的matchers匹配器,需要在每个react test文件的顶部引用,否则类似expect(dom).toBeInTheDocument()这样的断言则没法用,可以在setup中统一导入。@testing-library/react-hooks: 专门用于测试hooks的库。在@testing-library/react@13.1.0以上的版本已经把renderHook内置到里面了,但这个版本需要和react@18一起使用。eslint-plugin-testing-library: 基于eslint和testing library的最佳实践去做提示,避免一些常见的错误。
Basic
基本能力
- 组件渲染(render)
- 元素查找(get/query/find)
- 事件触发(fireEvent/userEvent)
基本使用
在编写单元测试过程中,可以按照AAA模式 实现。即:
- Arrange 编排,使用render
render(component)fireEvent.click(element)- Assert 断言,对期望的结果予以判断。
expect(result).matcher()example:
//Search.tsx
import React from 'react'

export const Search: React.FC<
  React.PropsWithChildren<{
    value: string
    onChange: (e: React.ChangeEvent) => void
  }>
> = ({ value, onChange, children }) => {
  return (
    <div>
      <label htmlFor="search">{children}</label>
      <div>
        <label htmlFor="search">{children}</label>
        <input id="search" type="text" value={value} onChange={onChange} />
      </div>
    </div>
  )
}
test file
//Search.test.tsx
import React from 'react'
// 引入@testing-library/react提供的方法
import { render, fireEvent, screen } from '@testing-library/react'
import { Search } from './Search'

describe('Search', () => {
  test('calls the onChange callback handler', () => {
    const onChange = jest.fn()
    // Arrange 编排
    render(
      <Search value="" onChange={onChange}>
        Search:
      </Search>
    )
    // Act 执行
    fireEvent.change(screen.getByRole('textbox'), {
      target: { value: 'JavaScript' }
    })
    // Assert 断言
    expect(onChange).toHaveBeenCalledTimes(1)
  })
})
常用API
render的参数:
render(
    ui: React.ReactElement<any>,
    options?: {
      container, // ui 渲染的位置,默认是创建个div并append到document.body上
      baseElement,
      hydrate,,
      legacyRoot
      wrapper, // 常用于注入类似React-Router、Redux、或者自定义的Provider
      queries //用于自定义选择器
    }
)
render的结果:
const {
    ...queries, // 选择器,例如(get/query/find)By(Text/Label/...)
    container: HTMLDivElement, // 默认自动创建一个div,并插入到body中
    baseElement: HTMLBodyElement, // 相当于document.body
    debug: Function, // 打印当前document.body
    rerender: Function, //重新渲染组件
    unmount: Function, //组件卸载,此时container.innerHTML === ''
    asFragment:Function //记录某个时刻的dom
} = render()
render的例子:
// 列出的是常用的
const { queryByText, container, baseElement, debug, rerender, unmount } =
  render(conponent)
cleanup
相当于给组件置成unmount,一般在afterEach()中执行,如果使用的Jest,不需要在afterEach中手动设置,框架已默认每次test结束后执行cleanup。
| search type (单个元素) | search type (多个元素) | function (查询单个元素) | 适用场景 |
|---|---|---|---|
| getBy | getAllBy | getByText getByRole getByLabelText getByPlaceholderText getByAltText getByDisplayValue | 由于只返回元素或error,适用于确定该元素存在的情况 |
| queryBy | queryAllBy | queryByText queryByRole queryByLabelText queryByPlaceholderText queryByAltText queryByDisplayValue | 用于元素可能不存在 |
| findBy | findAllBy | findByText findByRole findByLabelText findByPlaceholderText findByAltText findByDisplayValue | 用于异步元素 |
examples:
LabelText: getByLabelText: <label for="search" />
PlaceholderText: getByPlaceholderText: <input placeholder="Search" />
AltText: getByAltText: <img alt="profile" />
DisplayValue: getByDisplayValue: <input value="JavaScript" />
TestId: getByTestId: <div data-testid='search'></div>getBy*: 只用于确定该元素存在的情况。query*: 只用于断言当前元素不能被找到(可以在找不到元素的情况下不会抛出异常(返回 null)。唯一的好处是可以用来判断这个元素是否没有被渲染到页面上)。 因为类似get*和find*相关的 API 在找不到元素时都会自动抛出异常 —— 这样你就可以看到渲染的内容以及为什么找不到元素的原因。然而,query*只会返回null,findBy*:findBy主要是查找最终会出现在dom中的异步元素,如果能确定一个元素不会出现在dom里,则使用queryBy,否则使用getBy。
fireEvent
fireEvent(node, event)后面会详细讲解。
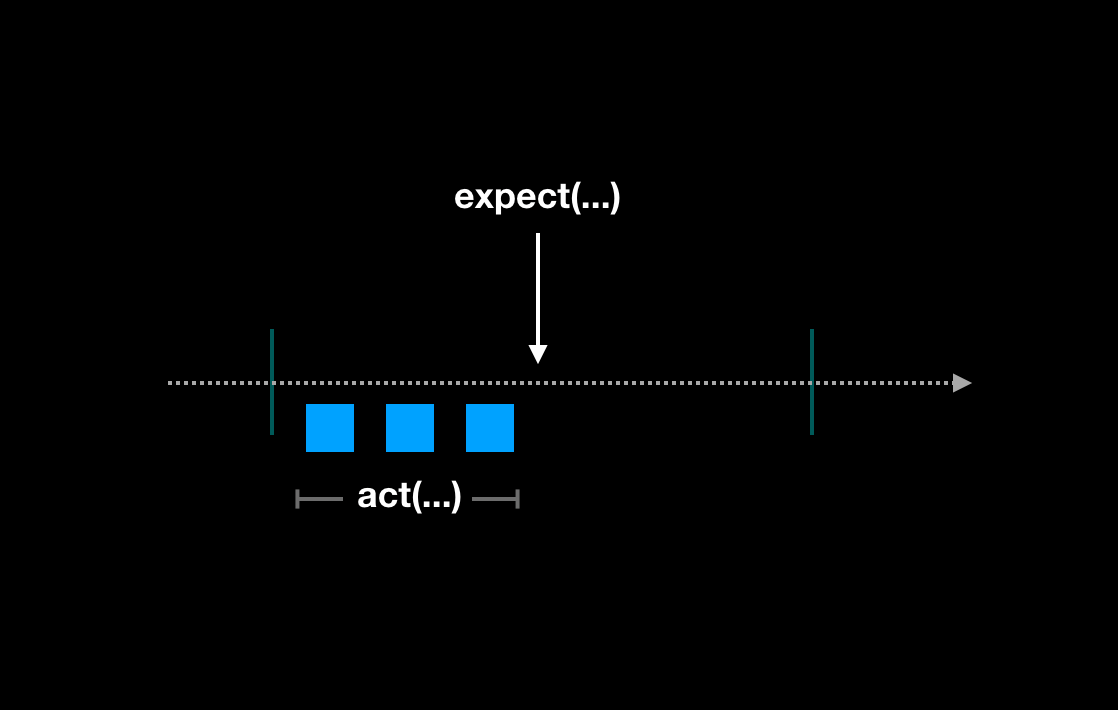
对react-dom/test-utils中的act 函数进行了一层包装。act的作用是在你进行断言之前,保证所有由组件渲染、用户交互以及数据获取产生的更新全部在dom实现。
act(() => {
  // render components
})
act(() => {
  // fireEvent
})
// make assertions
waitFor
用于异步
waitFor(Promise)waitFor 的目的是可以让你等一些指定的事情发生。在 waitFor 里等待指定的断言,不要传空 callback,如果传了空的 callback,可能它在今天还能 Work,因为你只是想在 Event Loop 等一个 Tick 就好了。但这样你也会留下一个脆弱的测试用例,一旦改了某些异步逻辑它很可能就崩了。
waitFor 适用的情况是:在执行的操作和断言之间存在不确定的时间量。因此,callback 可在不确定的时间和频率(在间隔以及 DOM 变化时调用)被调用(或者检查错误)。所以这也意味着你的副作用可能会被多次调用!
同时,这也意味着你不能在 waitFor 里面使用快照断言(SnapShot Assertion)。如果你想要用快照断言,首先要等待某些断言走完了,然后再拍快照。
建议:把副作用放在 waitFor 回调的外面,回调里只能有断言。
screen
screen的方法继承自queries, queries有的能力都有,此外还增加了debug()的能力.
补充
关于更多自定义的东西,例如render、选择器以及与Jest有的配置,查阅官方文档 吧,写得很清楚.
对于dom的一些断言,可以添加
testing-library库提供的@testing-library/jest-dom来更好得对dom进行断言。
// In your own jest-setup.js (or any other name)
import '@testing-library/jest-dom'

// In jest.config.js add (if you haven't already)
setupFilesAfterEnv: ['<rootDir>/jest-setup.js']
匹配器概览:
//Custom matchers
toBeDisabled
toBeEnabled
toBeEmptyDOMElement
toBeInTheDocument
toBeInvalid
toBeRequired
toBeValid
toBeVisible
toContainElement
toContainHTML
toHaveAccessibleDescription
toHaveAccessibleName
toHaveAttribute
toHaveClass
toHaveFocus
toHaveFormValues
toHaveStyle
toHaveTextContent
toHaveValue
toHaveDisplayValue
toBeChecked
toBePartiallyChecked
toHaveErrorMessage
//Deprecated matchers
toBeEmpty
toBeInTheDOM
toHaveDescription具体用法,可以查阅文档
详细教程
render a component
以一个最简单例子的开始 src/App.tsx
import React from 'react'

const title = 'Hello React'

function App() {
  return <div>{title}</div>
}

export default App
src/App.test.tsx
import React from 'react'
import { render, screen } from '@testing-library/react'

import App from './App'

describe('App', () => {
  test('renders App component', () => {
    render(<App />)
    screen.debug()
  })
})<body>
<div>
<div>Hello React</div>
</div>
</body>下面是一个稍微复杂一点的搜索input,使用了useState, event handler, props,是一个受控组件 (controlled component):
// todo
act
当写UI测试时,像react dom render, user events, or data fetching - promise的任务都会被看作用户与View的交互。 react-dom/test-utils提供act方法,确保所有这些动作在断言前,都更新并且作用到dom上。 act()接收一个函数作为第一个参数,并应用(apply)到Dom(jsdom)上,当act()函数被执行,可以使用断言,确保测试运行更贴近用户的真实体验。所以React测试希望所有是由状态变化导致的更新都被act包裹住 (如果是用原始的react测试方法的话)。
import { act } from 'react-dom/test-utils'

act(() => {
  // render components
})
// make assertions然而从react-dom/test-utils导入并使用是比较冗余的(因为一般不会从其倒入方法了),可以从testing-library/react导入。
import { act } from '@testing-library/react'
test('Testing', () => {
  act(() => {
    /* Codes you want to apply to the DOM */
    // eg:
    ReactDOM.render(<Counter />, container)
  })
  /* assume that the code is applied to the DOM */
})
Wrap By act
RTL中的render() , userEvent() , fireEvent()都已经被act包裹了。 也就意味这当你使用这些方法时,组件相关的state都会更新,额外添加的同步act不会改变任何东西。 (It means that every time you use one of these utilities, all component’s relevant state updates are flushed. An additional synchronous act() is not going to change anything.)
testing-library/react 覆盖了eventWrapper(),所以事件函数不用再使用act。可见code source
import { configure as configureDTL } from '@testing-library/dom'
import act from './act-compat' // overried
configureDTL({
  eventWrapper: (cb) => {
    // like userEvent.click()
    let result
    act(() => {
      result = cb()
    })
    return result
  }
})
因此就不用再用act去包裹userEvent了
// ❌
act(() => {
  userEvent.click(screen.getByText('Component'))
})
// ✅
userEvent.click(screen.getByText('Component'))当然,RTL的render也wrap了
function render(ui, { hydrate = false, ...rest }) {
  // ...
  act(() => {
    if (hydrate) {
      ReactDOM.hydrate(wrapUiIfNeeded(ui), container)
    } else {
      ReactDOM.render(wrapUiIfNeeded(ui), container)
    }
  })
}
简单的列子比如:
// ActOne.tsx
import { useState } from 'react'

const ActOne = () => {
  const [title, setTitle] = useState('')

  const handleClick = () => {
    setTitle('Clicked') // act() in RTL render() makes this update happen
  }

  return (
    <>
      <button onClick={handleClick}>Click me</button>
      {title}
    </>
  )
}

export default ActOne

// ActOne.test.tsx
import { render, screen, waitFor } from '@testing-library/react'
import userEvent from '@testing-library/user-event'
import ActOne from './ActOne'

// fail
it('renders title when clicked', () => {
  render(<ActOne />) // this is wrapped in act()

  userEvent.click(screen.getByRole('button'))

  expect(screen.getByText('Clicked')).toBeInTheDocument()
})

// success
it('renders title when clicked with findByText', async () => {
  render(<ActOne />) // this is wrapped in act()

  userEvent.click(screen.getByRole('button'))

  expect(await screen.findByText('Clicked')).toBeInTheDocument()
})

// success
it('renders title when clicked with waitfor', async () => {
  render(<ActOne />) // this is wrapped in act()

  userEvent.click(screen.getByRole('button'))

  await waitFor(() => {
    expect(screen.getByText('Clicked')).toBeInTheDocument()
  })
})
再如:
import { useEffect, useState } from 'react'

const UseAsyncInEffect = () => {
  const [title, setTitle] = useState('')

  useEffect(() => {
    const fetchData = async () => {
      const response = await fetch(
        'https://jsonplaceholder.typicode.com/posts/1'
      )
      const { title } = await response.json()

      setTitle(title) // this happens after the test is done
    }

    fetchData()
  }, [])

  return <h3>{title}</h3>
}
export default UseAsyncInEffect
test:
import { render, screen, act, waitFor } from '@testing-library/react'
import UseAsyncInEffect from './UseAsyncInEffect'

global.fetch = jest.fn(() =>
  Promise.resolve({
    json: () => Promise.resolve({ test: 100 })
  })
) as jest.Mock

describe('test use async comp', () => {
  // fail  ❌
  it('renders title', () => {
    jest.spyOn(window, 'fetch').mockResolvedValue({
      json: async () => ({ title: 'Fetched' })
    } as any)

    render(<UseAsyncInEffect />)

    // this happens before the state update is scheduled
    expect(screen.getByText('Fetched')).toBeInTheDocument()
  })
  // success ✅
  it('renders title with findBy', async () => {
    jest.spyOn(window, 'fetch').mockResolvedValue({
      json: async () => ({ title: 'Fetched' })
    } as any)

    render(<UseAsyncInEffect />)

    // this happens before the state update is scheduled
    expect(await screen.findByText('Fetched')).toBeInTheDocument()
  })

  // success ✅
  it('renders title with waitFor', async () => {
    jest.spyOn(window, 'fetch').mockResolvedValue({
      json: async () => ({ title: 'Fetched' })
    } as any)

    render(<UseAsyncInEffect />)

    // eslint: Prefer `findByText` query over using `waitFor` + `getByText`(testing-library/prefer-find-by)
    await waitFor(() => expect(screen.getByText('Fetched')).toBeInTheDocument())
  })

  // pass but not good
  it('renders title 3', async () => {
    jest.spyOn(window, 'fetch').mockResolvedValue({
      json: async () => ({ title: 'Fetched' })
    } as any)
    // eslint error
    await act(() => {
      render(<UseAsyncInEffect />)
    })

    // this happens before the state update is scheduled
    expect(screen.getByText('Fetched')).toBeInTheDocument()
  })
})测试会失败,并且由以下warning,具体原因可见后面的解析部分,简而言之就是由于跑测试时都是同步的,而React的更新却是由异步更新队列完成的。所以expect(screen.getByText('Fetched')).toBeInTheDocument() 这行其实是在状态更新之前运行的。(尽管render被act包裹了,但是UseAsyncInEffect中的setState是在promise中,render中act也只能确保是同步代码式写法的状态更新)。 
it('renders title', async () => {
  jest.spyOn(window, 'fetch').mockResolvedValue({
    json: async () => ({ title: 'Fetched' })
  })

  // 不要这样写
  await act(async () => {
    render(<UseAsyncInEffect />)
  })

  expect(screen.getByText('Fetched')).toBeInTheDocument()
})
这样虽然会通过测试并且消除警告,但却由2个问题
- 这种只会在状态更新是发生在下一次事件循环才会奏效;
act啥也没干,只是把警报隐藏罢了。
比如在fetchData添加再一个promise,上面的测试就会失败
const fetchData = async () => {
  const response = await fetch('https://jsonplaceholder.typicode.com/posts/1')
  const { title } = await response.json()

  await new Promise((resolve) => setTimeout(resolve, 0))

  setTitle(title) // this happens after the test is done
}所以使用eslint-plugin-testing-library 去避免没有必要的act包裹和错误用法是有必要的。

如何解决
可以使用RTL的Async Methods 即waitFor , waitForElementToBeRemoved 和 findBy queries解决。如上成功的case。
Deep Excavate
比如这样一个简单的组件
import * as React from 'react'
const ExampleOne: React.FC = () => {
  const [ctr, setCtr] = React.useState(0)
  React.useEffect(() => {
    setCtr(1)
  }, [])
  return <div>{ctr}</div>
}

export default ExampleOne
测试
import * as ReactDOM from 'react-dom'
import ExampleOne from './ExampleOne'
it('should render 1', () => {
  const el = document.createElement('div')
  ReactDOM.render(<ExampleOne />, el)
  expect(el.innerHTML).toBe('1') // fail!
})
报错如下: 
在页面的正常变现是会显示为 "1",但测试却显示的 "0"
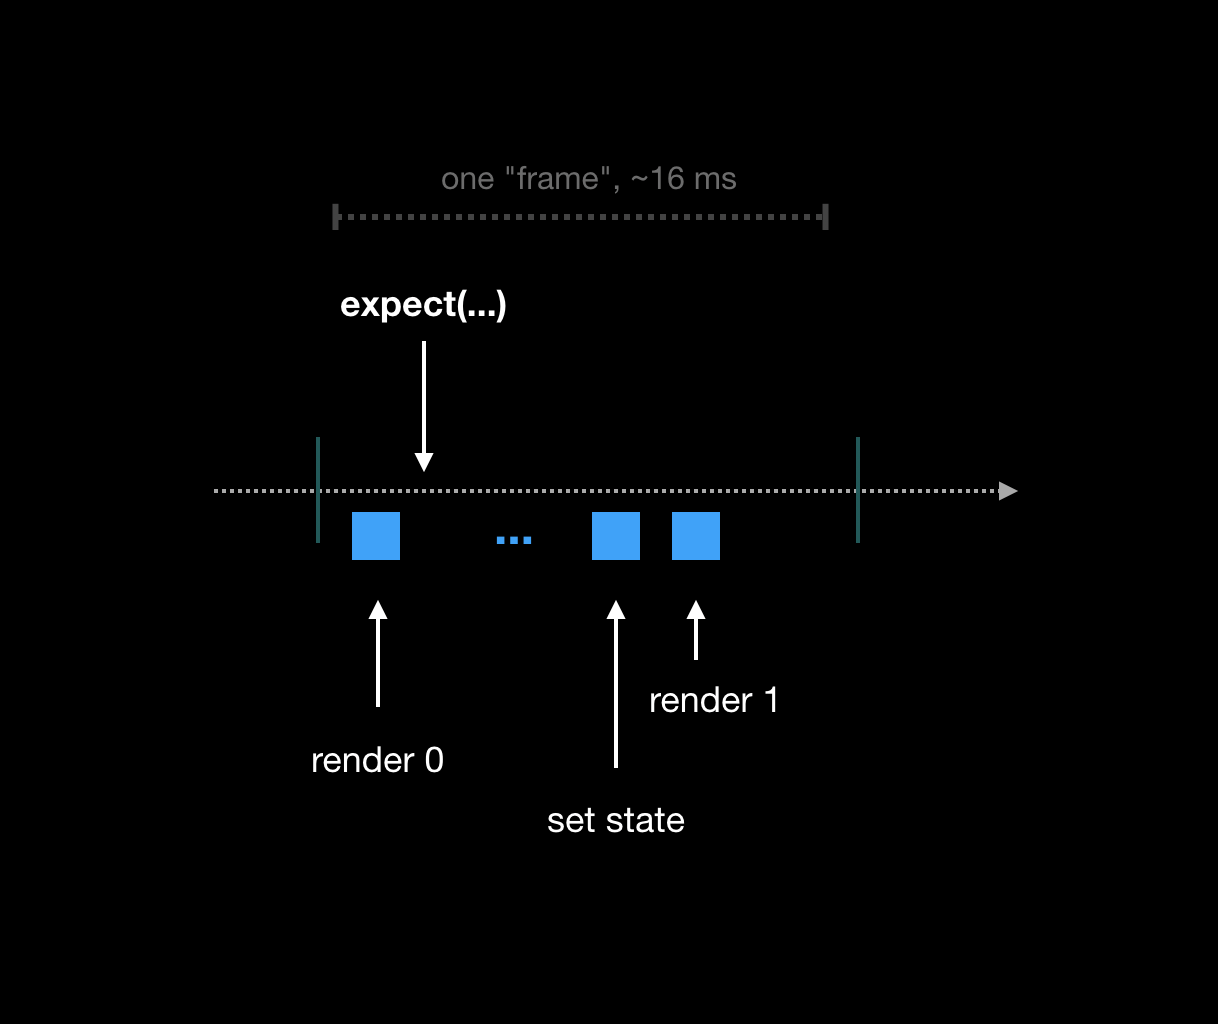
为什么这样子,就要涉及到React相关的原理知识,React并不是同步的渲染UI的,React会把任务切片,并形成一个任务队列,然后按优先级等执行。

使用act包裹后可以pass
import * as ReactDOM from 'react-dom'
import ExampleOne from './ExampleOne'
import { act } from 'react-dom/test-utils'
it('should render 1', () => {
  const el = document.createElement('div')
  // eslint-disable-next-line testing-library/no-unnecessary-act
  act(() => {
    ReactDOM.render(<ExampleOne />, el)
  })
  expect(el.textContent).toBe('1') // fail!
})
什么时候得用act
- 当使用
jest.useFakeTimers()时 - 当使用测试自定义hooks时
- 当使用
useImperativeHandle时
可以在这里-Fix the "not wrapped in act(...)" warning查看详细的case。
什么时候用userEvent和fireEvent
关于这2个API,可以认为fireEvent是一个更底层更基础的API,而userEvent基于事件动作/类型更上层的封装,更符合用户在真实的浏览器的行为表现。可以看其源码userEvent.click code
可以看到useEvent触发的事件行为更像用户在真实的浏览器触发的,比如fireEvent.change()只会触发一次change事件,userEvent.type也会触发一次change事件,但也会触发keyDown, keyPress, keyUp events.
以这个例子为例:
describe('Search', () => {
  test('calls the onChange callback handler', async () => {
    const onChange = jest.fn()

    render(
      <Search value="" onChange={onChange}>
        Search:
      </Search>
    )

    fireEvent.change(screen.getByRole('textbox'), {
      target: { value: 'JavaScript' }
    })

    // success
    expect(onChange).toHaveBeenCalledTimes(1)

    await userEvent.type(screen.getByRole('textbox'), 'JavaScript')
    // success
    expect(onChange).toHaveBeenCalledTimes(10)
  })
})断言都pass了,但明显使用userEvent时,onchange执行10次更加符合真实的场景。
@testing-library/user-event 是在 fireEvent 基础上实现的,但它提供了一些更接近用户交互的方法。上面这个例子中,fireEvent.change 其实只触发了 Input 的一个 Change 事件。但是 type 则可以对每个字符都会触发 keyDown、keyPress 和 keyUp 一系列事件。这能更接近用户的真实交互场景。好处是可以很好地和你当前那些没有监听 Change 事件的库一起使用。
所以:
// ❌
fireEvent.change(input, { target: { value: 'hello world' } })

// ✅
userEvent.type(input, 'hello world')
正确地查找元素
查找元素是在写测试是一个最基本的操作,查找出的元素一般会用来使用user-event触发事件或者使用 Jest/jest-dom 来做断言判断。建议可以完整的看下官方文档 ,这部分写的很详细。这里做下内容提炼和注意点笔记。

优先级
尽量使用无障碍的特效去查找
- getByRole,Roles
- getByLabelText
- getByText
- getByDisplayValue
尽量使用语义话去查找
- getByAltText
- getByTitle
使用Test IDs
- getByTestId
- 一般情况下,当你在想我该用那个query方法时,首选的都是
*ByRole,其他的情况可以参考下面的some case
getBy vs queryBy
getBy会返回一个元素或者一个错误,这个方法是很明确的,就是Dom中要么找的到,要么报错,唯一的毛病就是不能检查一个元素不应该在Dom中。
import React from 'react'
import { render, screen } from '@testing-library/react'

import TestQueryOne from './TestQueryOne'

describe('App', () => {
  test('renders TestQueryOne component', () => {
    render(<TestQueryOne />)

    screen.debug()

    // fails
    expect(screen.getByText(/Searches for JavaScript/)).toBeNull()
  })
})如上,上面的测试会失败,因为getBy 找不到就会报错啊,所以这个时候,queryBy就改派上用场了。所以上面的断言换成这样就可以了。因为queryBy找不到不会报错而是返回Null
expect(screen.queryByText(/Searches for JavaScript/)).toBeNull()所以,到底使用getBy 还是 queryBy,只需要看你是不是需要断言一个元素不该存在于Dom上。
findBy
findBy就是用于异步查找咯,findBy会返回一个Promise,这个Promise默认在1秒内没有找到这个元素或者找到了不止一个,就会Reject。比如:
点击查看代码
import * as React from 'react'

type User = {
  id: string
  name: string
}

function getUser(): Promise<User> {
  return Promise.resolve({ id: '1', name: 'Robin' })
}

function SearchInput() {
  const [search, setSearch] = React.useState<string>('')
  const [user, setUser] = React.useState<null | User>(null)

  React.useEffect(() => {
    const loadUser = async () => {
      const user = await getUser()
      setUser(user)
    }
    // setTimeout(() => loadUser(), 1500)
    loadUser()
  }, [])

  function handleChange(event: React.ChangeEvent<HTMLInputElement>) {
    setSearch(event.target.value)
  }

  return (
    <div>
      {user ? <p>Signed in as {user.name}</p> : null}

      <Search value={search} onChange={handleChange}>
        Search:
      </Search>

      <p>Searches for {search || '...'}</p>
    </div>
  )
}

type SearchInputProps = {
  value: string
  onChange: (e: React.ChangeEvent<HTMLInputElement>) => void
  children: React.ReactNode
}

export function Search({ value, onChange, children }: SearchInputProps) {
  return (
    <div>
      <label htmlFor="search">{children}</label>
      <input id="search" type="text" value={value} onChange={onChange} />
    </div>
  )
}

export default SearchInput
test file
import SearchInput, { Search } from './index'
import React from 'react'
import { render, screen, fireEvent } from '@testing-library/react'
import userEvent from '@testing-library/user-event'

describe('SearchInput', () => {
  test('renders SearchInput component', async () => {
    render(<SearchInput />)

    // succeeds
    expect(screen.getByText(/Searches for/)).toBeInTheDocument()
    expect(screen.queryByText(/Signed in as/)).not.toBeInTheDocument()
    // 会error,如果是 setTimeout(() => loadUser(), 1500)
    expect(await screen.findByText(/Signed in as Robin/i)).toBeInTheDocument()

    fireEvent.change(screen.getByRole('textbox'), {
      target: { value: 'JavaScript' }
    })

    expect(screen.getByText(/Searches for JavaScript/)).toBeInTheDocument()
  })
})

describe('Search', () => {
  test('calls the onChange callback handler', () => {
    const onChange = jest.fn()

    render(
      <Search value="" onChange={onChange}>
        Search:
      </Search>
    )

    fireEvent.change(screen.getByRole('textbox'), {
      target: { value: 'JavaScript' }
    })

    expect(onChange).toHaveBeenCalledTimes(1)
  })
})

describe('Search', () => {
  test('calls the onChange callback handler', async () => {
    const onChange = jest.fn()

    render(
      <Search value="" onChange={onChange}>
        Search:
      </Search>
    )

    fireEvent.change(screen.getByRole('textbox'), {
      target: { value: 'JavaScript' }
    })

    expect(onChange).toHaveBeenCalledTimes(1)

    await userEvent.type(screen.getByRole('textbox'), 'JavaScript')

    expect(onChange).toHaveBeenCalledTimes(10)
  })
})如果把loadUser()替换为setTimeout(() => loadUser(), 1500),findByText的case那里测试就会失败。
查找多个元素
- getAllBy
- queryAllBy
- findAllBy
some case
text is broken up by multiple elements
html如:<h3>Hello <span>World</span></h3>,h3 中的text被标签分割了。
// Error: TestingLibraryElementError: Unable to find an element with the text: /hello world/i. This could be because the text is broken up by multiple elements. In this case, you can provide a function for your text matcher to make your matcher more flexible.
screen.getByText(/hello world/i)

screen.getByRole('heading', { name: /hello world/i })
// or more precisely for h3 tag
screen.getByRole('heading', { name: /hello world/i, level: 3 })
Finding multiple elements
比如在一个组件中html如:
<h3>Login now</h3>
<button>Login</button>
如果这样去query,对于测试用例来说,是很脆弱的,轻易的改动就可能fail。
const logins = screen.getAllByText(/login/i)
const loginButton = logins[1]
更好的写法是:
const loginButton = screen.getByText(/login/i, { selector: 'button' })
// or
const loginButton2 = screen.getByRole('button', { name: '/login/i' })即使用的options参数去缩小范围。比如第一个case中用heading 和level 而不是 h1...h6 标签.
查找空元素
比如图标这样的
<style>
  /* default class for fonts-face with icons */
  .icon {
    font-family: 'IconFontRoleImg' !important;
  }

  /* specific class for icon */
  .icon-star-bg:before {
    content: '\e982';
  }
</style>
<p>
  <span class="icon icon-star-bg"></span>
</p>
其实,html结构应该为
<p>
  <span class="icon icon-star-bg" role="img" aria-label="Favorite"></span>
</p>这样就可以使用getByRole('img', { name: /favorite/i })。
查询没有role对应的
*ByRole也不是银弹,有些场景也是不能用*ByRole的,比如查找一个没有role的元素,如密码输入input,可以从官网 上找到其他对于的API,已可以利用这个 网站:testing-playground ,粘贴对于的Html结构,就看到该使用那个了。  使用浏览器插件更加方便 Chrome or Firefox .
reference
- React单元测试策略及落地
- React Testing Library Tutorial
- Making sure you're using the correct query
- 使用
React Testing Library的 15 个常见错误 - Act Deep Excavate
- You Probably Don’t Need act() in Your React Tests
- When should I use act() in react-testing-library?